Saturday, February 2, 2013

Sewing Small Circles on a Ladybug Pattern


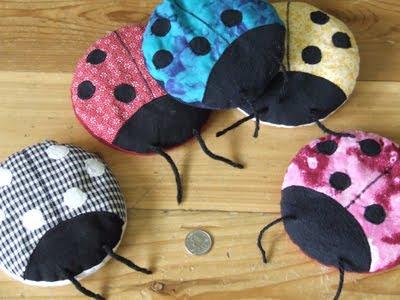
If you haven't seen these before, you can purchase an inexpensive pattern to make one yourself here.  Here's  a tip on how to sew those small little dots on with a satin stitch that actually looks good.


If you want to make one from my pattern you can find it here.
First off, pin the dots where you want them. My first thought is to use a baste stitch, or a long stitch (length 4), but it is actually less secure for when you use the satin stitching. Use a normal stitch length (2-3) and sew very close to the raw edge of the dot- See Below Picture. (If you want extra secure dots, use 'wonder-under' or other double sided fusible interfacing.)

Use the side wheel to hand 'crank each stitch so that it doesn't veer off the curve, pivoting the fabric every 3 or so stitches.

For the Satin Stitching, use Zig Zag stitch with a length at about 0.5 or near 0. Keep your hand on the wheel to pivot it every 3 or so stitches so it has a uniform look to it- Otherwise it will look more like polygon. If you want it to look really good, patience is the key.

For the more confident seamstress, just slowly sew using both hands to constantly pivot to make the curve. I admit, I wasn't as patient as I could have been while making this ladybug. I think the next one is the one I will list in my etsy shop.

Saturday, January 26, 2013

Simple Brown Skirt Tutorial

So about 7 years ago I had a brown skirt that I would wear all the time. It used to be my mother's. One day I was cutting out some fabric while wearing the skirt. Yes, I was dumb and careless and cut a nice big 5 inch cut into my skirt because part of it was underneath the fabric somehow. I was so mad at myself for doing something so dumb! I've wanted to make another brown skirt for a while. I've had the fabric sitting and waiting for at least 3 or more years. Other projects always took priority until last week. I finally made it! It was very easy and simple. I love easy stuff.
I used a 54 inch wide lightweight polyester/spandex knit (stretchy) material for this skirt- exactly the type I use for my nursing shawls that I sell on etsy!
First, I measured about the length I wanted it on me. Next, my waist and 'halfed' it, adding seam allowances and an extra couple inches. The fabric is folded in half with selvages on either side. I used the measuring tape to make a curve on the corner, made marks with chalk. Next, I used the measuring tape as a compass, holding the end at the corner, and holding the chalk and the tape at the point of the waist measurements. I made more exact curve/waist markings pulling the tape side to side (see photo above.) Add the length of the corner to the waist to the length of the skirt you want and do the same 'compass' technique to mark the hem of the skirt. Cut.
Next, I measured out about 5 inches wide and a generous length for the waistband (about 4 inches longer than I thought I would need.) I will use 1 inch wide elastic. Sew right sides together at 1/4 inch seam allowance(my favorite size- I really like to conserve fabric, and I was going to trim it off to that size anyway...). Trim of extra length of waistband.
Pin right sides of back seam together, matching waistband seams. Stitch using a straight stretch stitch. Say that ten times really fast.
Pull the fabric with both hands as you stitch this back seam to prevent 'bunching' of the seam. (I know you might have heard that you should never pull fabric through when you sew, but you are not pulling it through the foot faster, you are only stretching the fabric!) See photo below.
(See Below picture) Fold the waistband over to the inside and pin, matching seams. Leave a 1 to 2 inch gap for elastic. Have the outside/right side showing when you stitch. Use a decorative stretch stitch. (This hides any imperfections if you don't sew straight!) Make sure the waistband has been sewn down. I had to go back and redo about 3-4 inches that didn't get connected (I hardly ever pin anything unless I have to match up seams.)
Put the elastic around your waist to your comfort and mark with chalk or pin or marker. Use a large safety pin to pull the elastic through. Pin it at the point you think will fit and try it on. If it is good, cut, making sure you've left the space to connect it. Sew the waistband space closed.
Try on the skirt to make sure that the hem is even. Trim to adjust as necessary. To finish the hem, fold over and sew down at edge. I never pin because it would make the stitch look crooked. It is about 3/8 inch double fold. Pull the fabric a little as you do this to make sure there isn't a 'buckling' or 'crumpled' look at the bottom. You are finally done! Good luck!

Saturday, January 19, 2013

Easy Quesa-pizza Recipe!


This is something I did to use up extra pizza sauce. It's just pizza sauce spread thin on a flour torilla, onions (chopped and frozen-easy to grab), grated colby jack cheese, parmesean cheese. Put on a hot (medium-high) griddle until the cheese starts to melt and then take it off. The cheese will finish melting on the plate. It really took like a minute to heat or less. Great for feeding multiple children at one time. I really like pizza, too!

Saturday, January 12, 2013

Homemade Ladybug Tag Toys


I've been on a ladybug theme lately. I made a turtle tag toy a while ago, and wanted to make more. I wanted to give a couple of these to someone who had twin girls.

These are super easy to make. Double-knit polyester is great durable fabric for baby toys.
Babies seem to love the tags on the toys the most, hence 'tag toy'.

Saturday, January 5, 2013

Handkerchief Shirts for School Clothes


I found some cute bargain fabric at Walmart($1.50-2.00/yd.) and had this pattern I bought on sale for 99cents somewhere (Hobby Lobby or JoAnn's). I finally made a shirt for each of my school girls. The shirts were very simple to do. The knit was pretty stable, having a good 'stretch-back'. (Sorry I'm bad at vocabulary.) I made each one probably under 2 hours after cutting.

Saturday, December 29, 2012

Fudge Truffles

They are just as good as they look!
I made fudge and, sadly, it didn't set up.  Since I had recently dipped marshmallows in chocolate, I thought about what the fudge would be like if I dipped it in chocolate, too.  It would be easier to pick up by hand in a hard outer chocolate shell.  I figured the outcome couldn't turn out too badly! We liked these so much that my mother is thinking of putting this recipe in her next cookbook!

DIRECTIONS:
I refrigerated the fudge so I could cut and separate the pieces onto a wax paper-lined cookie sheet, and then froze them.  I used Ghirardelli double chocolate dipping squares and carefully dipped each one and put them onto another wax paper lined cookie sheet.  White chocolate might be something to try, too.

(If you need a recipe for fudge, here is one from the can label I used that works fine, called: Old Fashioned Western Family Fudge.  Type 'old fashioned fudge' in recipe search.  I didn't add the nuts, and I used margarine instead of butter.)

Man, these are a good idea to repeat!  Thank goodness for failed fudge!
Come visit my etsy shop to see my head jewelry and nursing shawls!

Friday, December 21, 2012

How to Make a Pillow Case Nightgown

What is the traditional present that everyone opens on Christmas Eve? Pajamas. Here is a tutorial on how to make a pillowcase nightgown from fabric, not a pillowcase, for your kids, grand kids, niece, or anyone! Use holiday fabric or just her favorite licensed design.

Materials needed for size 10-12 girls:
  • 1 yard 45"(or wider) or 1 1/2 yard 44" fabric for body
  • 8" of 45" or wider fabric for top edge
  • thread
  • 1 yard 1/2" wide elastic OR 1 1/2 yards ribbon.
This shape is so simple, adjusting to make larger or smaller sizes is very simple. Add/subtract 1/2" or so for each size larger or smaller, taking into account height.

Finished garment
measurements are:
34"long
22"across
8"armhole length

Fits a size 10/12 girl.
1)I found a piece of fabric that looked like it would fit my daughter well- make sure there is space for the body AND the arms to go through.
2)I cut a rectangle out of the folded fabric.
22 1/8"x33 5/8" you can round up or down.
(44 1/4"x 33 5/8" unfolded fabric measurement)
3)I found another fabric to add to the top as the casing for the elastic. You can use ribbon or cord, too. I put it next to the length of the first peice to match the length and folded edge next to folded edge and then cut it to allow for the width of the elastic with 'gathering space' x2 and then add 1/2" seam allowance.
(I only use 1/4" seam allowances- if you are not experienced in sewing I recommend you use the standard 5/8" s.a. Added up it would be 1 1/4" s.a. onto the width of the casing, not 1/2".)
My elastic is 1/2" wide. My casing is 2 1/4". I allowed a lot of gathering space.
4)Sew 'right sides together'.
5)Iron upwards toward casing.
6)Turn under raw edge of casing 1/4"if this is the size of s.a., or 5/8" if that is the s.a. you are working with. Stitch.
7)Mark your armhole length down the sides. Fold your s.a. around armhole and iron. Stitch. Stitch side seam.
*On the folded side of gown, mark the line to cut down the side from the top. Fold over about 1/4" around armhole and use a wide sitch (zig-zag) to 'enclose' the raw edge.
I forgot to do this step BEFORE sewing the casing down. Boy, that was annoying!
8)Fold the casing in half and pin.
9)Stitch next to edge. (HINT: I use a wide decorative stretch stitch because it hides imperfections in stitching straight.)
10)Finish the bottom by folding it 1/4" and folding it one more 1/4" so it is rolled inside its self. Pin if necessary or just stitch as you roll.
11)Use a safety pin to move the elastic or ribbon through the front and back casing. You may want to put 2 ribbons through so you can tie them at the shoulders to look cute, but my experience is that they quickly come untied.
12)Keep the elastic 'too long' until you fit it. Add length to overlap elastic and cut. Add cute decorations, flower shapes, pockets, anything you want- just make sure it's still comfortable to sleep in!

Here is another great tutorial on how to make an 'Elf Cape'. It uses simple shapes. It fits 4t to size 10 girls. Imagine using green knit and faux fur edging around the hood... Perfect for your little elf!